Reconstrucciò motor 356 B 1750
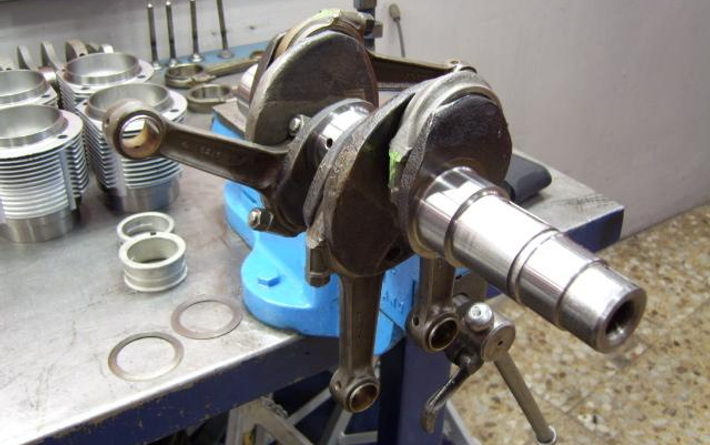
Ahora le toca el turno a las arandelas del cigüeñal

ahora colocaremos el reten trasero y las arandelas que fijaran la holgura longitudinal del cigüeñal.

vista del retén y las arandelas de diferentes medidas.

colocamos arandelas.

retén.

esta imagen podemos apreciar la arandela de separación del volante motor.

colocamos la arandela.

colocamos volante.

tiempo ahora de colocar la tapa frontal del motor. Podemos apreciar como ya está colocado el último casquillo de bancada.

tóricas por donde pasará la lubricación interna.

colocamos la tapa.

pac,pac,pac,….

vista del motor cerrado.

colocamos el reten frontal.

chaveta.

polea.

la pequeña bomba de aceite.

piñón principal, cuya tracción es ofrecida por el propio árbol de levas.

el otro piñón previamente comprobado su desgaste. Observamos la grasa de litio de color verde.

tapa de la bomba en su sitio.

este es el piñón que se encargará de hacer girar el delco y de proporcionar movimiento a la bomba de gasolina al mismo tiempo.

es necesario calar el motor de la forma correcta antes de introducir el piñón.

en esta vista se observa el piñón alojado en su sitio y el orificio por donde se introducirá el vástago d ela bomba de gasolina que será accionado por el mismo piñón.

este diminuto muelle se colocará antes del delco.

colocamos las tóricas nuevas en el delco y la bomba de gasolina.


vista ……

radiador de aceite reparado antes de ser instalado.

vista ……

bujías nuevas.


empezaremos con el blindaje del motor.

aquí vemos el juego de juntas y la tapa inferior de cárter por donde se vacía el aceite del motor.

vista ……

ahora colocamos las válvulas de seguridad del circuito de lubricación.


tapón lateral

vista ……

sensor de temperatura y presión de aceite.

tuberías laterales de escape con el conjunto de calefacción.

cartucho de aceite nuevo.

motor totalmente montado, listo para colocar en el vano motor.

un ayer y una evolución del air-cooled. Four-flat and six-flat.

vista ……

minutos antes de instalar el motor.

y por fin motor montado. Es una delicia después de arrancarlo observar y escuchar su gran facilidad para subir de vueltas!!!!!

David dos Santos
Agradecer a David, propietario de
Su colaboración con ![]() y por este magnífico reportaje sobre el 356
y por este magnífico reportaje sobre el 356
Uno de nuestros coches de competición, revisado por David en su pulcro taller

![]()